
Upcycled Sweater – FOR THE BOY!

Let the holiday Season BEGIN!!!
Now that Halloween is over, I feel like I officially start thinking of Christmas presents. Of course, we all love to be generous and give presents you know the receiver will love – while trying to be budget friendly as well!
This is one of the many reasons I love thrift shopping and upcycling. While I may not give a present that was simply purchased at a thrift store, I would DEFINITELY give a present I bought at a thrift store and turned into something new!
Like say…an old adult sweater, turned into a new kids sweater!

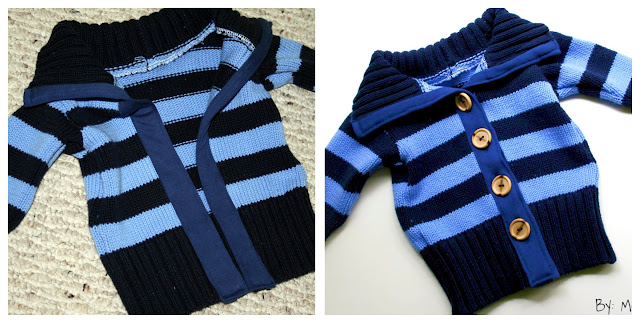
I actually got this idea from a Kids Gap Sweater that came out for the Fall Season, but can’t find a photo of the original inspiration anywhere! I happened to stumble across this blue striped sweater at my local Salvation Army, and knew I had to give it a go.
It really is quite simple once you get the hang of it. The only trick when upcycling sweaters is that you will NEED to zig zag stitch or serge the hems, because it will fray…A LOT. And also to have a vacuum on hand, because you will need it! HA!
To make this kids sweater you will need an old adult sweater, one that has a big chunky hem. As well as a kids shirt that is the size you will need to turn it into, or at least a pattern for one. Lastly, just a bit of scrap knit and some buttons, and you are in business!
Let’s get started…
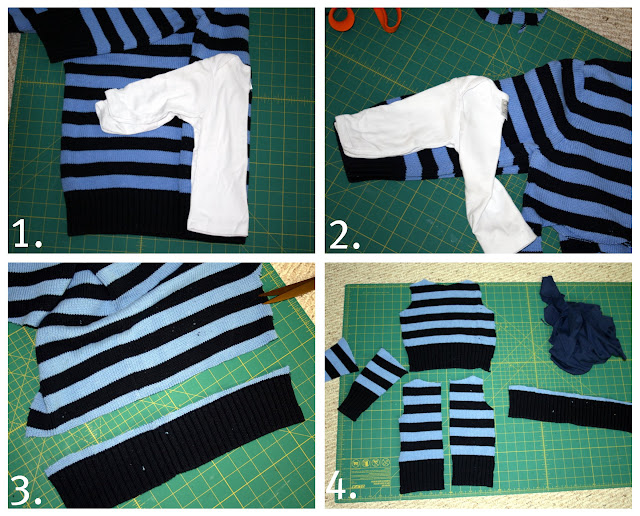
1. Taking an old shirt you already have to use as the Pattern Piece, place the shirt on the BOTTOM of the sweater, so we can reuse the sweater’s bottom hem, as well as on the fold. Cut around the shirt, adding an additional 1 – 1.5″ around the shirt pattern.
2. Place the sleeve of your shirt on the BOTTOM of the sweater’s sleeve, so we can also reuse that hem. Cut around your shirt pattern, using the top of the sleeve as the fold. Cut one out of each sweater sleeve.
3. Lastly, cut the remainder of the sweater’s chunky hem off, as we will be turning that into the new sweater’s collar.
4. Cut one of your sweater’s body pieces in half down the front middle, to give you two front sweater pieces – and you should now have this. (1) Back, (2) Front, (2) Sleeves, (1) collar fabric
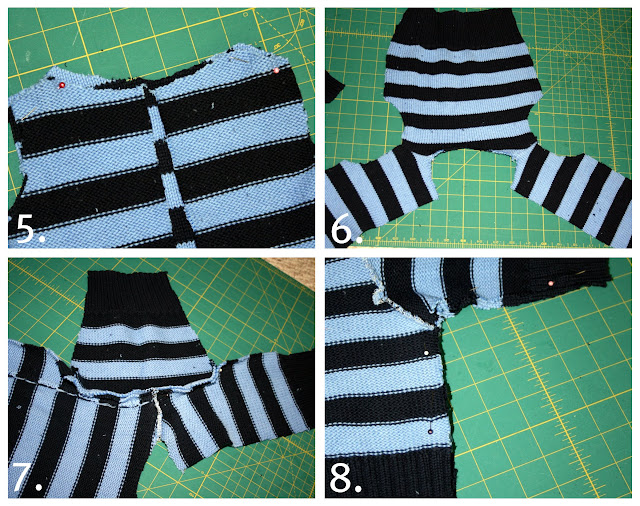
5. Take your Front sweater pieces and place on top of your Back sweater piece, right sides together. Pin and Sew shoulder seams ONLY.
*Note – as I mentioned before, sweater frays A LOT. So you will need to zig zag stitch seams, or serge.
6. You will now have this if you lay it all out.
7. Take your Sleeve piece, and pin the upper arc right sides together to the armhole opening of your sweater. Sew.
8. Fold sweater right sides together, matching up the side seams and underarm seam. Pin and sew.
9. You now have something resembling the sweater – YEAH!
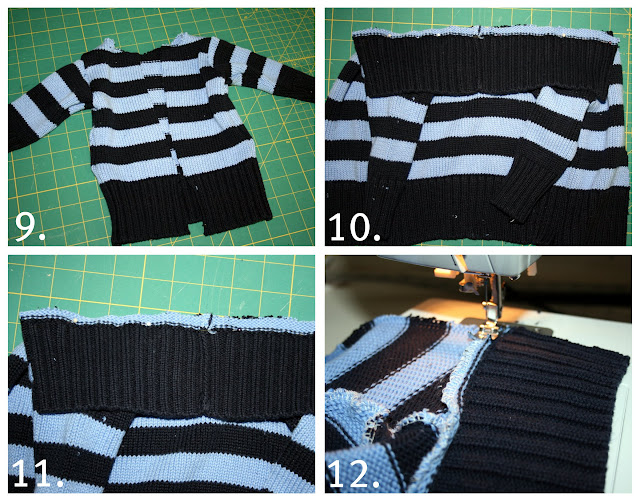
10. Take the old sweater’s chunky hem that you cut the excess off of, and pin the cut edge to the top of your sweater’s neckline. Cut to fit so that it is the same size lengthwise.
11. Pin and sew.
12. Once you have zig zag or serged this hem, you will want to press it down towards the sweater, and edge stitch over it to keep the seam in place.
13. We are almost there!
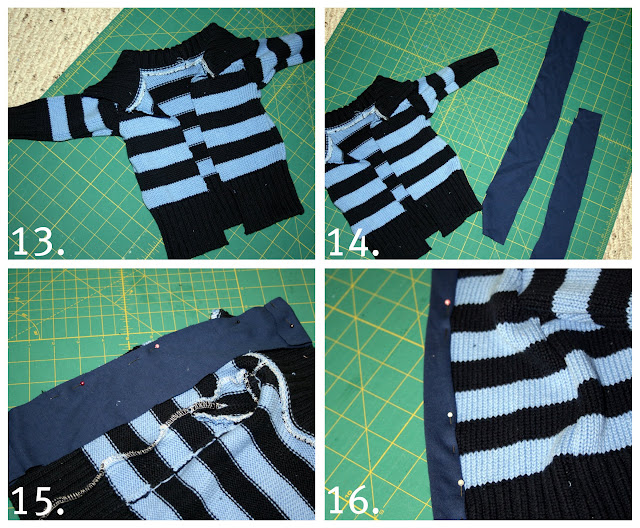
14. Take your scrap knit fabric, and cut (2) so that they are each 2.5″ Wide x the length of your sweater +1″.
15. Attach the raw edge of one to the front opening of your sweater on the wrong side and pin. Let 1/2″ hang over the top and bottom. Sew 1/2″ away from the edge.
16. Fold over the knit to the front, fold the top and bottom 1/2″ in, as well as the raw long edge under, and pin in place along the outer edge. Edge stitch to secure in place. Repeat for both sides of the sweater.
All you have to do now is add your buttonholes and buttons and you are finished!
How great is that?!
For Under $4 I have a brand new sweater that any little boy or girl would love. Nobody would know it wasn’t brand new, and the best part of all is that it was made with love…

Thanks so much for stopping by, and until next time…Happy Sewing!


XOXO
Diana
www.thegirlcreative.com
Adorable! Love that last picture of the baby. What a sweetie…the sweater is precious on him 😉
So cute… I just love this!
I love this, what an amazing tutorial. I have been looking into re-using some old clothes, I wonder if I could manage to do this for one of my friends’ babies.
Oh my! That is the cutest thing EVER! I love it!
Super cute, as always, Jessica!
I thought, sure, what a great idea but then I saw the sweater on the little cutie and boy I wish I had a young baby to makeover a sweather! Too cute!
I can’t believe you made that! It looks so professional! And he looks adorable in it! I love little preppy clothes for baby boys!
Such a great color to pair with his red hair! So adorable! Thanks for the tutorial. I love upcycling projects!
LOVE this!!!!
Oh I LOVE this!!! My son is a big fan of “grandpa sweaters” as he calls them…this is such a great way to create own without hunting half the world over to find some in his size! Thank You!!!
This is super cute! What a great idea! I can’t wait to try this one out!
Great idea! I have a couple of old sweaters that would make cute, warm cardigans for my toddler – – this looks like a great money saver for this year! 🙂 thanks… pinning now! 😉
Carla 🙂
Dang, that is so cute!! Excellent job on it! I am so impressed with this upcycle 🙂
Thanks for sharing!
Lindsay
http://www.craftyladylindsay.blogspot.com
Super cute sweater, and a baby!
This is soo cute! I love it!
Wow! That’s brilliant!
So cute! Love all the boy tutorials. Just found you through the pattern giveaway, and love everything! Thanks for having me.
I’m so glad I found your blog. Did you know it’s somewhat hard to find patterns/tutorials on upcylcing for boys clothes? Another one pinned!
“Nobody would know it wasn’t brand new, and the best part of all is that it was made with love…” – This is exactly why I sew and DIY!
I love your recycling. Karen http://www.madewithmytwohands.blogspot.com
such an inspiring project! and, what an adorable baby!!
Oh my gosh, that is just ADORABLE!! I love the idea of using the chunky hem for a collar! Thanks so much for sharing! 🙂 Lisa
Such a lovely idea! Up-cycling old clothes this way is so clever. Thank you for the inspiration!