{personalized notepaper}
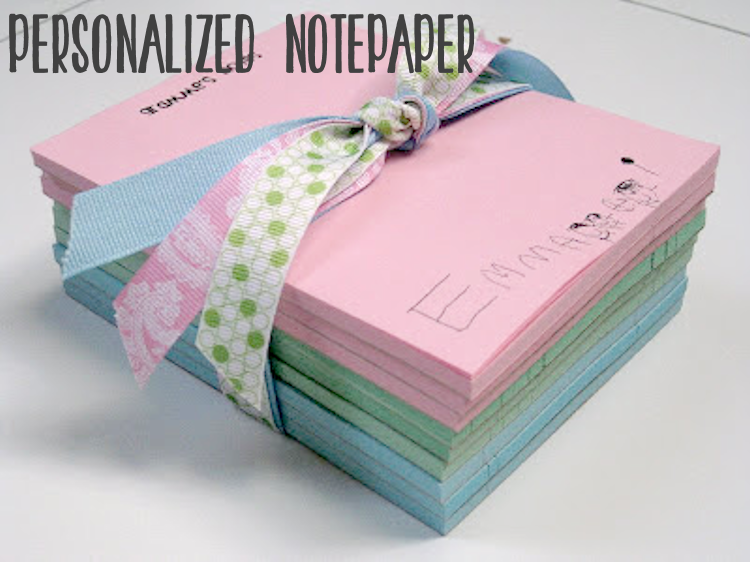
Hey! It’s Kierste, from over at Simply Kierste! I absolutely love this project. I first made a set of notepaper for my mom a few years ago when my oldest was realy young, and have made them regularly ever since. It’s perfect for even the little ones to get involved with, especially for Mother’s Day and Father’s Day (great for dad’s desk!).
This is super easy, and SO fun. Any one would love this gift!
- 8 1/2 x 11 sheet of white paper
- pen
- printer
- your imagination!


4. You could actually do this step first if you prefer, but it doesn’t really matter. (Unless the artwork at the bottom would be ruined going through the printer–then you would want to do this step first.) I also do it in this order, just in case someone wants to start over. This way I don’t have to keep printing out the words until I know they are ready to go. In Word (or other word processing software), type any text that you would like to be at the top of your notepaper, then print. I chose a different font for each child, and sized it to 16. You don’t want it to be too big, so you have plenty of space for the actual notepaper.

5. Now you’re ready for the printer! I use a local print shop, but I called first to make sure they made notepaper. I had them put four to a page, so 1/4 sheets. (25 copies = 100 pieces of notepaper) When I made stationery, I did 1/2 sheets instead, so they would be a little bigger.


Totally cool!
Just out of curiosity (and pure cheek..) how much does that cost?
I know I’ll have to sort of work out in €, but just so I get an idea, cause that makes for a great party favor or stocking filler too! 🙂
Thanks,
Bird
WOW! I sell stationery but I think this is so creative & special with the kids’ artwork! Very cool!
That’s so cute! Awesome Mother’s Day gift!
Great idea. I know my little gal would love her own personalized note paper!
absolutely adorable. my mom would love this. She is like me: a list queen!
What a sweet idea!
Blessings,
Nancy
I too am wondering how much something like this costs to have done- love the idea!!
I have a link party on Tuesdays and would love to have you join! http://www.craftedition.blogspot.com
Love this idea. So cute and practical!
I just love this idea!
It really is going to depend on your printer for the exact cost. Usually they charge per sheet of colored paper (it was .07 at my printer), then a charge for cutting and setting a template. I did three separate sets, so they charged me for a cutting fee per set. I paid $25 for all three, but in the past I’ve usually only done one, and it was around $15. It will vary, though. When I checked prices, it was actually cheaper at a large copy store, but we don’t have one in our town, and I would have had to travel to get there, so I stayed locally.
Check around though–you’ll get the best price.
What a great idea for a mother’s day gift! I would love to try this!
What is sauce for the goose is sauce for the gander…………...................................……..
Those are so sweet. I would love to have some like that. I will have to tuck that idea away to be used later.
You know I did that years and years ago before my second child was born. I ought to do it again – thanks for the inspiration!!
this is such a cute idea!
Great idea! Thanks for sharing it ~ it’s perfect for mom’s day!
That is such a sweet idea! Perfect for a Mother’s Day/Grandparent’s Day gift.
What an awesome idea for preserving that adorable childhood art and getting to see it everyday! I love this idea! Maybe in the form of a grocery list with a magnet on the back? Ummm… my wheels are turning now!
-Sarah from Create Studio
http://www.createstudio.blogspot.com
P.S.- Just noticed that I’m on your blog roll!! WOO HOO! Thank you, I’m honored!
-Sarah from Create Studio
http://www.createstudio.blogspot.com
This is too stinking cute! I love that its personalized!!
~Morgan
Meet Virginia!
Meet Virginia!
Meet Virginia!
I LOVE this idea, my kids would have a ball making them too. Thanks so much!!
Ha! I love it! That’s the cutest project I think I’ve ever seen!
☺ Celeste
Stopping from Life in the Pitts. I’m so making some of these. Great idea for Mother’s Day!! My husband’s grandmothers would love these with a scripture at the bottom. Thanks for sharing!!
this is such a great idea, this would also be a great teacher appreciation gift!
Love that idea! I had my kids finger paintings turned into notecards when they were little. It’s a great grandparent gift.
I’m new to the blogging world and looking forward to exploring your blog more.
These are so cute! And so easy. I had no idea it would be so simple. (I love the drawings your kids made 🙂
Thank you for linking this to A Little Craft Therapy, with Life in the Pitts.
Following you from MBC!
Jeanette Huston
http://www.mommyblessingsinsmallbundles.com/
Oh wow! What a great idea! And it will give the kids such confidence! Love it! Patsy from HeARTworks