
Easy DIY Farmhouse Christmas Ornaments That You Can Make and Gift This Holiday Season

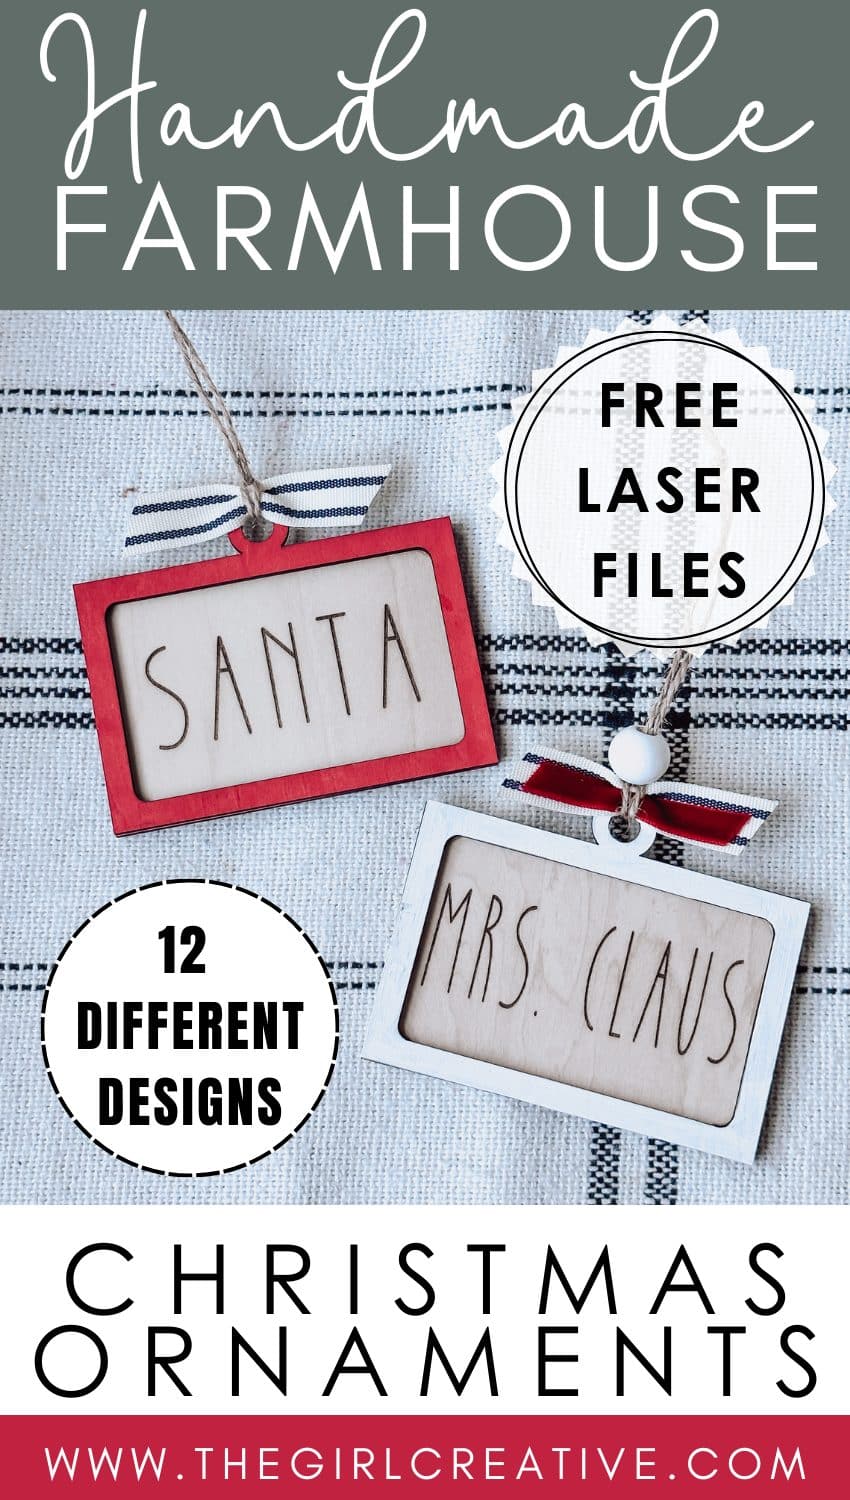
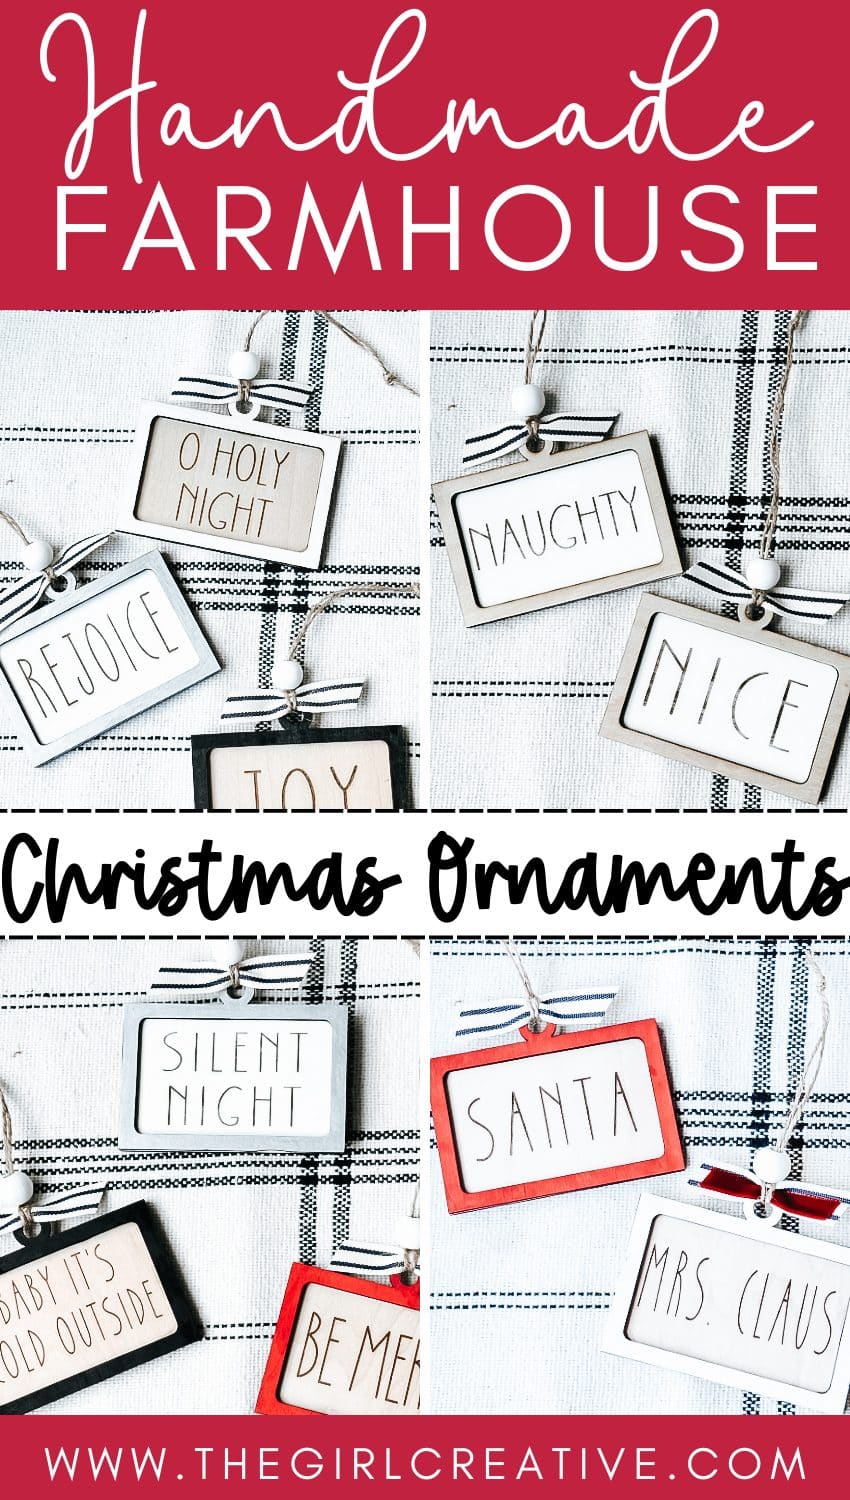
Deck the halls with these Easy DIY Farmhouse Christmas Ornaments. Inspired by Rae Dunn, this collection of holiday quotes and sayings are the perfect addition to your Christmas tree. With a small list of supplies and your laser engraving machine, you’ll have these rustic, farmhouse Christmas ornaments done in no time.
It seems as though the busier I get the more productive I become. Does that happen to anyone else? This year – especially during these holiday months – I find myself with a long to-do list. I honestly don’t mind because my list is filled with things I love to do.

EASY DIY FARMHOUSE CHRISTMAS ORNAMENTS THAT YOU CAN MAKE WITH YOUR LASER ENGRAVING MACHINE
A few months ago I told you about my new laser engraving machine, the M1 from xTool. You can read all about it in this post. It has brought my love for creating up to a whole new level.
Today I’m so excited to be sharing with you this collection of easy DIY farmhouse Christmas ornaments that I made with my M1. If you have a laser machine as well, you can download the free files at the end of this post and make these fun Rae Dunn inspired ornaments too!
RELATED: MORE Free Rae Dunn Inspired SVGs for Cricut and Silhouette Crafts
SUPPLY LIST TO MAKE FARMHOUSE CHRISTMAS ORNAMENTS
- Laser Engraving Machine: As I mentioned above I used my xTool M1 to make these farmhouse Christmas ornaments but you can make them with a Glowforge or any of the other xTool laser engravers.
- Basswood: This is my favorite material to work with. I purchased 3mm Basswood from Amazon and that’s what I used for this project
- Acrylic Paint Pens: With small Christmas crafts like this, paint pens are a must have. It’s a simpler, much easier approach to painting.
- Jute Rope or Baker’s Twine
- Gorilla Super Glue
- Clamps (optional)
- Ribbon (optional)
- Wooden Beads (optional) I used 16mm beads and they were a bit big. I recommend 14mm for this project.
HOW TO MAKE RAE DUNN INSPIRED FARMHOUSE CHRISTMAS ORNAMENTS
These Christmas ornaments were designed in Silhouette Studio and the SVG file was imported into XCS – xTool Creative Space software. This tutorial is for the xTool M1 and is ideal for someone who is familiar with the XCS software and the machine.
At the bottom of this post you’ll find a download link for the SVG files to make these ornaments.
There are 12 sayings/holiday words that are included in these files:
Santa | Mrs. Claus | Naughty | Nice | Noel | Cheer | Silent Night | Rejoice | Be Merry
O Holy Night | Baby It’s Cold Outside | Joy
Step One: The first thing you want to do is turn your M1 on and properly vent it. I run my machine in my living room and I don’t have the air purifier so I vent my machine using the exhaust hose from the back and putting it out the window.
Step Two: Get your material ready and load it into your machine. If you have the honeycomb base, go ahead and secure it with the magnets that came with it. This isn’t necessary but if your wood is warped in any way, this will definitely help.
Step Three: Open the SVG file in XCS. You do this by clicking “IMAGE” from the menu on the left and then locating the file on your computer.
IMPORTANT NOTE: There are two files containing all 12 words (6 words in each file) and one file with the frames. Follow these instructions for the “words” files and then just use the cut settings for the frames.
Step Four: Choose your material from the menu on the right. I used 3mm basswood for these farmhouse Christmas ornaments. Select all the rectangles and set to “CUT” from the menu on the right. The default settings worked for me (100/5/1 – power/speed/pass).
SIDE NOTE: Always do a test cut prior to sending the whole job to the machine.
Select all the words and set to “ENGRAVE” from the menu on the right. The default settings (70/175/1 – power/speed/pass) should work but always do a test prior to sending the whole job to the machine.
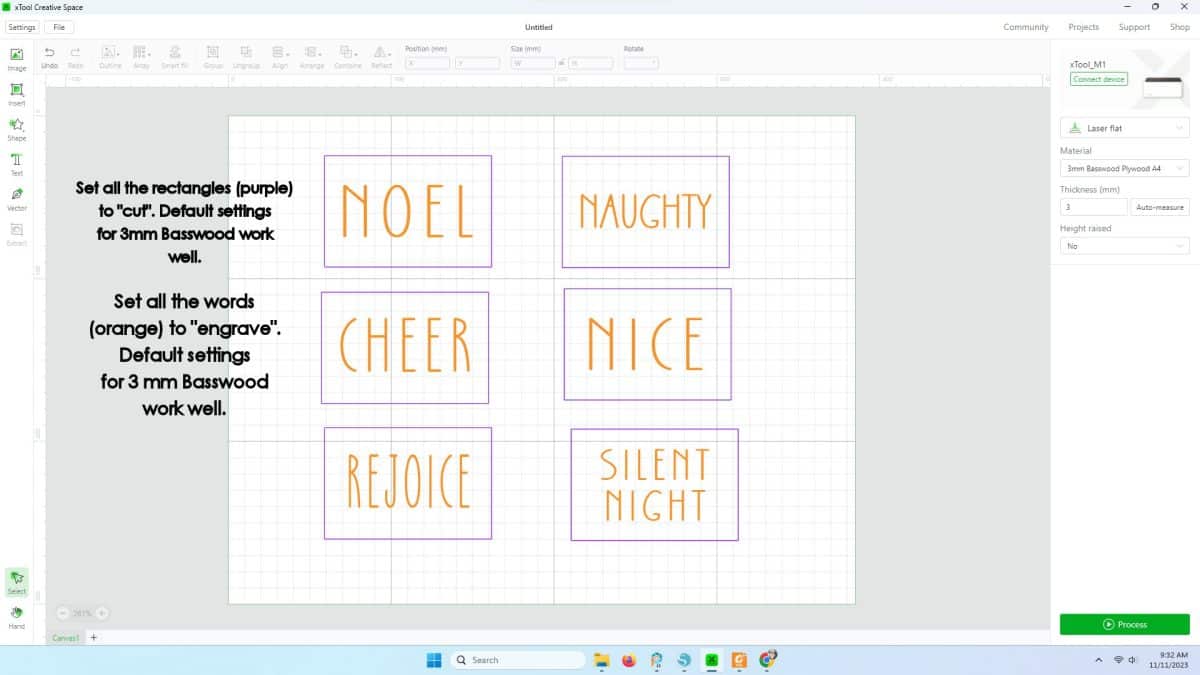
Step Five: Send job to the M1 by clicking the green “PROCESS” button in the bottom right hand corner (see photo for reference).
Next your screen will change and you’ll see a close up of your project. Click “OK” on the screen and then press the start button on the front of your M1. It will be lit up in blue.
SUPER IMPORTANT NOTE – Never leave your machine unattended. The laser produces a tiny flame which is how it cuts, engraves and scores and has the potential to cause a fire due to incorrect settings:materials.
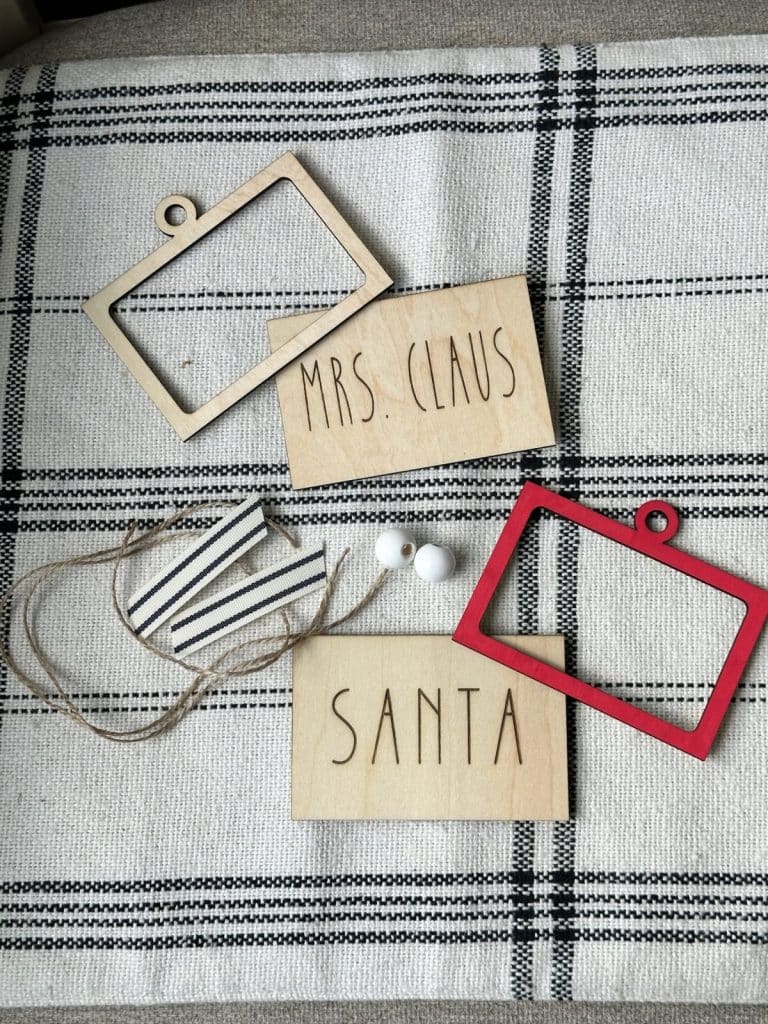
Once you have your words engraved and the rectangles cut out, remove it from the machine in addition to any little pieces of scrap wood.
Go ahead repeat steps 2-4 (ignore the “engrave” portion) and the file you want to work with next is “Farmhouse Rae Dunn Ornament Top Frame”.
NOTE: If you make the whole set of 12 ornaments, you’ll need to cut 2 sets of frames as there are only 6 in the frame file.
Thanks to my air assist I don’t have any charred or burnt edges on my work. If you don’t have an air assist, you can cover your wood with transfer tape prior to cutting and engraving.
There’s a method to doing it this way that I can’t into right now but it does require adjusting the settings, do a lot of test cuts, etc. The xTool M1 Official Facebook Group is wealth of information and you can get a lot of advice on this topic.
HOW TO ASSEMBLE FARMHOUSE CHRISTMAS ORNAMENTS
This first part isn’t really assembling but it’s a step that you should do BEFORE assemble: painting the frames.
I absolutely love using acrylic paint pens/markers for projects like this. It’s quick and easy and there’s no mess.
I purchased a pack of 35 premium acrylic paint pens from Amazon and they work well. They come with fine point and medium point but for most of my projects, I go with the medium point.
Paint the frames in the colors of your choice and once they’re dry, add a few dots of Gorilla glue on the corners and the sides and carefully place on top of the rectangles with your Christmas words and quotes.
Clamps are totally optional but I highly recommend clamping the 2 pieces together after the glue so they adhere nice and tight. Also, you don’t have to sit their holding them together waiting for the glue to set.
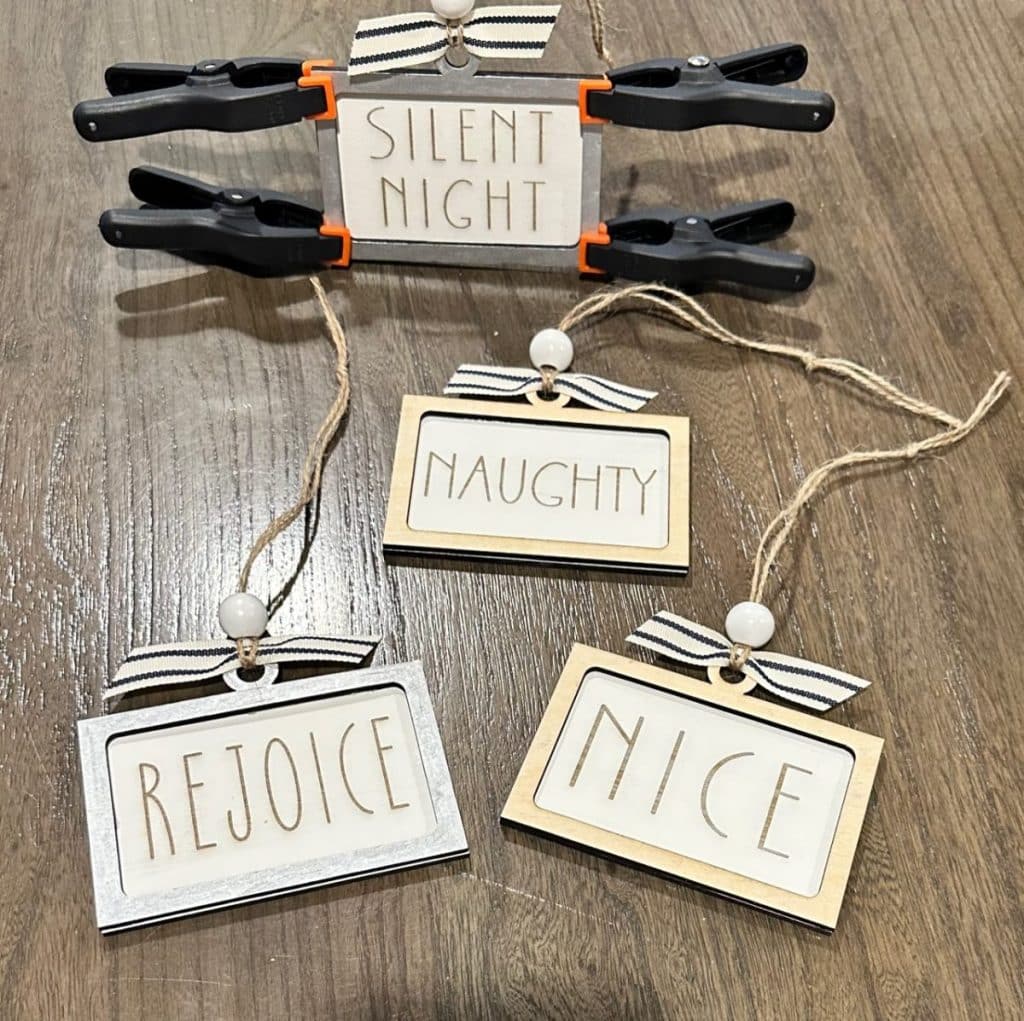
Last but not least, grab your twine, add a small piece of ribbon and finish it off with a wood bead.

SIMPLE DOWNLOAD INSTRUCTIONS
To download all 12 farmhouse Christmas ornament files, please complete the form below. After you submit all of your information, check your inbox. Your files should be arrive within 5 minutes or so. If you do not see them, refresh your inbox.
Can these files be used with the Cricut Explore Air 2, leaving out the frames? I didn’t see a separate file for just printing the words.
Yes. In the download there are 3 files total: 2 of them are just the words and the other is for the frames. 🙂