
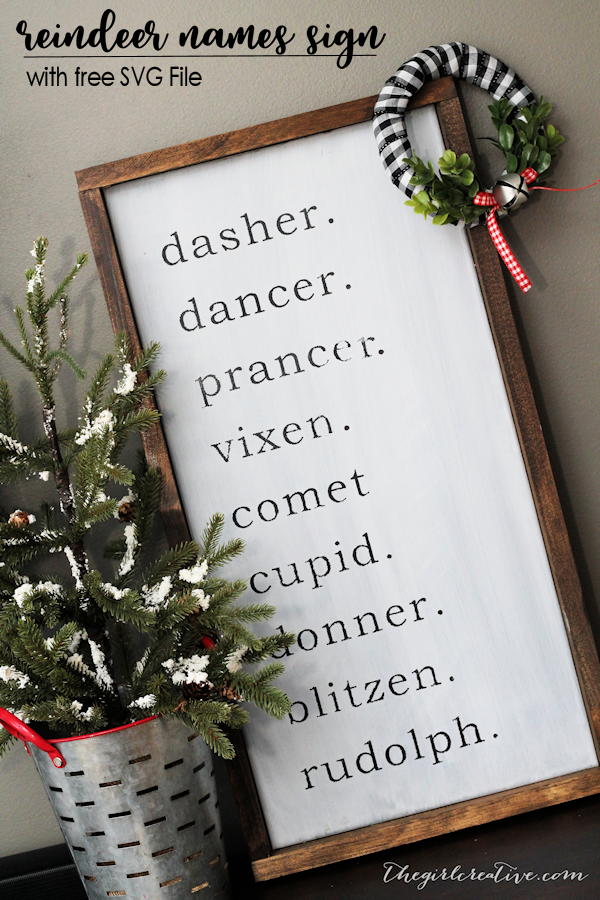
DIY Farmhouse Reindeer Names Sign
Sometimes you just need something really simple to make a huge statement. This DIY Farmhouse Reindeer Names Sign fits the bill. Keep reading below for all the details on this project and learn how to make your own. You can also snag the free SVG file so making one yourself is just that much easier.
A few years I ago a wrote a blog post featuring some spectacular Rustic Christmas Decorating Ideas. Among those ideas was a reindeer names sign that one of my favorite bloggers, Liz Marie Blog, shared.
I didn’t have time back them to make one myself or even the confidence to do so but I filed the idea away in the back of my mind knowing that eventually I would give it a try.
The time had finally come a few weeks ago when I told my husband that I needed a day in the garage to work on a Christmas project.
RELATED: NEW (2018) RAE DUNN Inspired Printable Christmas Signs (with CUT FILES)
12 SAYINGS – One Easy Download
Over the summer I taught myself how to use our nail gun. A few years ago my husband showed me how to do basic cuts with our chop saw. Being a huge fan of the blog Simply Kierste and her tutorials on making farmhouse signs, I finally felt ready enough to try it myself.
The idea and the concept was simple but in all honesty, I did run into a few issues. I learned a few lessons and I’ll pass that info onto you.
Before we get started allow me to make this disclaimer: I took all the progress pictures with my iPhone. They are unedited and flawed. Just putting that out there. Ha!

DIY Farmhouse Reindeer Names Sign
SUPPLY LIST
12×24 Canvas or Wood (I strongly recommend wood)
Furring Strips
Reindeer Names SVG (download at end of post)
Minwax Stain (Dark Walnut)
Rags
Brad Nailer and Nails
Free Cut File for DIY Reindeer Names Sign
I’m just going to explain to you the order of which I did everything. I basically followed these instructions from Simply Kierste so if you feel lost about anything I’m saying, she does a great job of explaining. Don’t be afraid to pop on over there for reinforcements.
I knew that I wanted my sign to be white with black letters. I could have painted my sign white and used black vinyl lettering. That definitely would be the easiest thing to do. I decided to paint my sign black first and use my vinyl lettering as a stencil. I then painted over the lettering with white paint and peeled the letters off afterwards.
Okay, let’s do this.
DIY Farmhouse Christmas Signs
Step One: Paint your canvas or wood black using black craft paint. Set aside to dry.

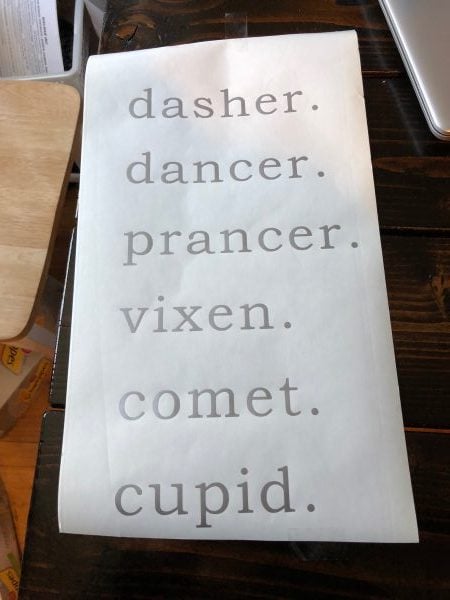
Step Two: While your paint is dying, cut out the reindeer names out of vinyl using your cutting machine. Note: Make sure your computer is plugged in or charged before doing this part. I made the mistake of cutting out my lettering when my battery was about to die. Yeah. Not a great idea. I may or may not have had to cut these letters out twice due to flaky ways. lol Once the vinyl is cut, weed out the background and just leave the letters on the vinyl backing. Once you are ready to apply the letters to the painted sign, use your transfer tape to lift the letters off the backing and transfer them to the sign. Here is a great tutorial on how to do this step if you are new to making signs or using vinyl lettering as a stencil.
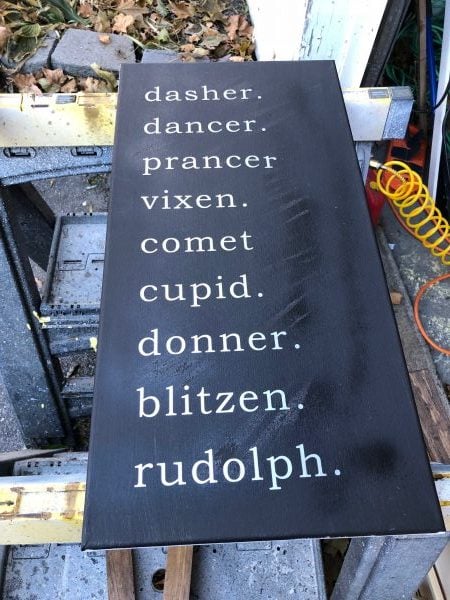
Step Three: Once you have your vinyl lettering on your painted sign, paint over them with white paint. I recommend doing 2-4 coats of paint allowing each coat to dry completely.
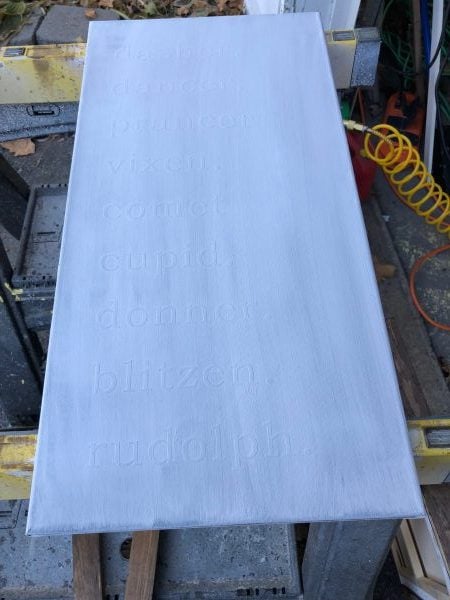
Step Four: After the final coat of white paint, carefully peel off each letter. This will now leave you with a white sign with black letters. Once your sign is completely dry, feel free to do a little light sending if you want to give it a bit of a distressed look. FYI – I did NOT do this part.
Now it’s time to make the frame. This part is a bit time consuming because your measuring, cutting, staining, nailing the long sides of the sign. Then you are doing it all over again for the short top and bottom sides of the sign.
I guess you could have just stained the whole length of the furring strips before you started cutting so that all you had to do was stain the cut edges once it was all said and done. And that actually would be much easier. Hind sight is 20/20 so now I know for next time. This was a learning process for me and I’ll definitely do things differently next time around.
Reindeer Names Farmhouse Christmas Sign
Step Five: Cut the furring strips to the length of the board. In my case it was 24″. So I cut (2) 24″ lengths of the furring strips and stained them. Once they were dry I took my nail gun and with the edge of the furring strips flush to the back of the board, I nailed the strips to the canvas. I did that for both long sides. Next I measured from one end of the short side of the sign from edge to edge to get my next length. I cut 2 of the same lengths, stained (allowed to dry) and nailed them to the sign. I’m sorry that I don’t have photos of this last step but hopefully you’ll understand what I mean by looking at the pictures.

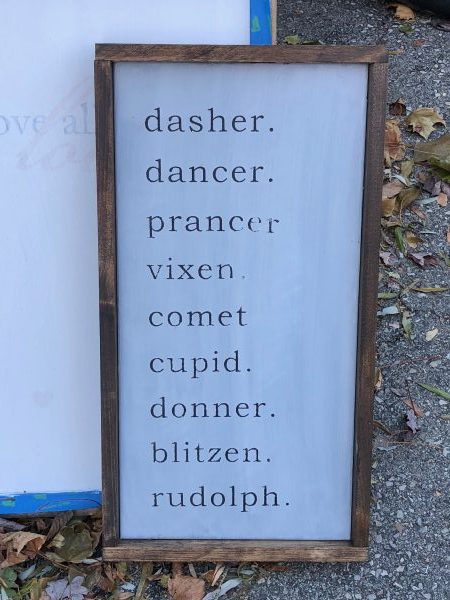
You may notice that there are some imperfections in my sign. The “r” in prancer is crooked. I had some issues with getting my lettering to stick to the canvas (which is why I recommend wood instead) but I decided to leave it the way it is. This sign was definitely a labor of love for me. It took me quite a few hours from start to finish with all of my lettering issues.
I also cut one of the pieces of my wood frame wrong and didn’t realize it until after I had it nailed to the canvas. Had to do that all over again. Not to mention I was hugely distracted by the work being done across the street at my neighbors house. But dang it, I was determined to get this sign done! What do you think?
Overall I am so pleased with how it came out. I know as I continue to make more farmhouse signs like this, the process will become more seamless. But for now? This is good.
Just in case you want to make one too, I’m including the FREE SVG cut file. Please be sure to read the usage instructions when you click through.

Rustic Christmas Decorating Ideas


Christmas Tree Farm Sign (free SVG)
Love it
Hello, Did the Reendeer Free File expired? If yes, How much is it? Thanks
Hi Eve,
It didn’t expire but may have needed some updating. It’s all updated now and includes SVG, DXF, PNG and EPS files. Enjoy! XO
Thank you very much. I love looking at you site and all the things you create.